Plugins
Since version 2.19
The analytics library is designed to work with any third party analytics tools via plugins.
Plugins are a powerful abstraction that let you:
- add a new analytics provider (like Google analytics or Meta pixel)
- hook into an existing analytics provider plugin
- or add any kind of logic to react to visitor actions
Plugins can be broken down into 2 types:
- Provider plugins - connecting to third party analytic services
- Custom plugins - additional features, data manipulation, & any other side effects.
Both have the same signature, and are registered in the same way, here we will explore how they are implemented within a Front-Commerce app.
You can look at the analytics library documentation to learn more about the plugin types.
Writing a new plugin
You can also request and contribute plugins within the analytics library ❤️ Open Source
Let's say for this example we want to create a new provider plugin for a third
party analytics tool acme. We will name this plugin acme.
Provider plugins typically
- Load in the third party analytics script via initialize
- Use
trackorpageevents to send data into a third party analytics tool (There is also another eventidentifywhich is not currently implemented in Front-commerce) - Have a loaded function to let analytics know when its safe to send the third party data.
Here is an example if the acme plugin:
// `settings` is the value defined in the plugin config in `config/analytics.js`
export default function acmePluginExample(settings) {
  // return object for analytics to use
  return {
    /* All plugins require a name */
    name: "acme",
    /* Everything else below this is optional depending on your plugin requirements */
    config: {
      whatEver: settings.whatEver,
      elseYouNeed: settings.elseYouNeed,
    },
    initialize: ({ config }) => {
      // load provider script to page
    },
    page: ({ payload }) => {
      // call provider specific page tracking
    },
    track: ({ payload }) => {
      // call provider specific event tracking
    },
    identify: ({ payload }) => {
      // call provider specific user identify method
    },
    loaded: () => {
      // return boolean so analytics knows when it can send data to third party
      return !!window.myPluginLoaded;
    },
  };
}
Extending with EcommercePlugin
The EcommercePlugin plugin is a plugin provided by Front-Commerce. It allows
you to create an interface to map
e-commerce events and properties
to the relevant events and properties for your acme provider, you can find a
full list of events in the
EcommercePlugin.js
Below is an example of how to extend the acme plugin to handle e-commerce
events.
import { EcommercePlugin } from "web/core/analytics/plugins/e-commerce";

// Extend the EcommercePlugin with your custom overrides
class AcmeEcommercePlugin extends EcommercePlugin {
  // The event we use during tracking in the case is "Product Viewed"
  productViewed = (payload) => {
    return {
      // Use the event name required by acme
      event: "acme_view_item",
      // Map the props to the required props of acme
      properties: {
        product_id: payload.sku,
        product_name: payload.name,
        product_currency: payload.currency,
        product_price: payload.price,
      },
    };
  };

  // You can also add other events like "Product Reviewed", "Product Shared".
  customEventsAndProperties = {
    // the event key used in your `trackEvent` call
    "Product Reviewed": (properties) => {
      return {
        // the tracking method will be called with this event
        event:"acme_product_reviewed",
        // the tracking method will be called with these properties
        properties: {
           product_id: properties.sku,
           review_rating: properties.rating,
        },
      }
    },
    "Product Shared": (properties) => {
        return {
          event:"acme_product_shared",
          properties: {
             product_id: properties.sku,
             method: properties.method,
          },
        }
    },
  };
}

export default function providerPluginExample(settings) {
  // wrap your config with the ecommerce plugin
  return new AcmeEcommercePlugin({
    // ... same config as defined in the previous example
  };)
}
We handle this internally for
known plugins
like the google-analytics
plugin.
If you are aware of any other providers which require this, please let us know or feel free to contribute to our analytics examples.
Using Plugins
In Front-Commerce the plugins are dynamically required via the script property
in your config/analytics.js configuration, this allow us to only import and
load scripts based on authorisation (cookies), which in turn reduces the page
loading for your end users.
Let's add our acme plugin to our config/analytics.js file.
module.exports = {
  analytics: {
    // ...config
    plugins: [
      // ...plugins
     {
        // remember to add the `acme` to your cookieServices config or disable the needConsent
        name: "acme",
        needConsent: true,
        // all these settings will be passed to your plugin script
        settings: {
          whatEver: "foo",
          elseYouNeed: "bar",
        }
        // add a dynamic import to load the plugin script
        script: () => import("my-analytics-module/plugins/analytics-plugin-acme.js"),
      },
    ],
  },
};
Just like any other plugin, don't forget to setup the
cookiesServices.js
file accordingly, in order to load the newly created integration only when the
user has given their consent.
Custom plugins common pain points
In some cases, the documentation for implementing the tracking might not be
compatible with SPA's
architectures. This can be the case if they are asking you to add a script tag
in your head, or at the end of your body without any further information.
Indeed, if we're doing this, it's likely to be because the tracking service
wants to load the script tag each time the person navigates. However, if we do
this in an SPA, the script will only be loaded once. Here is the list of
solutions you can try to implement:
-
Look for additional documentation to see if they have a
scriptthat can be used as a library that gives access to some kind of global variable that can then be called by your implementation. Something that would work like the code shown below. If this is the case, it means that you can calltrackingVariable.track()in your integration instead of adding a new tag script each time.<script src="http://tracking.example.com/script.js"></script>
<script>
trackingVariable.track();
</script> -
Look inside the script itself. The script you've been given may be a shortcut and the solution might live in the script itself. If this is the case, this means that you can try to duplicate the scripts content and adapt it to your integration.
-
If none of the solutions above work, you can always try to load the script several times by adding a
?random=${new Date().getTime()}at the end of the URL. This will trick the browser into thinking they are different scripts and allow you to load it multiple times.
Implementing a great tagging plan for an e-commerce application is a tough journey. If you have any further questions about how to implement them in Front-Commerce, please contact us. We'll be happy to answer them.
Common Plugins
Here is a list of frequently used plugins across e-commerce shops
Google Analytics 4
Install the google-analytics plugin
npm install @analytics/google-analytics
Configuration example in src/config/analytics.js
{
  name: "google-analytics",
  needConsent: true,
  settings: (authorization) => {
    return {
      measurementIds: ['G-abc123'],
      gtagConfig:{
          anonymize_ip: !authorization
      }
    };
  },
  script: () => import("@analytics/google-analytics"),
}
Google Tag Manager
Install the google-tag-manager plugin
npm install @analytics/google-tag-manager
Configuration example in src/config/analytics.js
{
  name: "google-tag-manager",
  needConsent: true,
  settings: (authorization, otherAuthorizations) => {
    // This ensure an event is pushed with current authorizations
    // right after the plugin's initilization.
    window.dataLayer = window.dataLayer || [];
    window.dataLayer.push({
      event: "initConsents",
      userConsents: otherAuthorizations,
    });
    return {
      containerId: "GTM-ABC123",
    };
  },
  script: () => import("@analytics/google-tag-manager"),
}
Update your CSP in
src/config/website.js according to the tags you use (see
Google Tag Manager's documentation
for more details)
In GTM, you will then be able to leverage several specific things configured in your plugins.
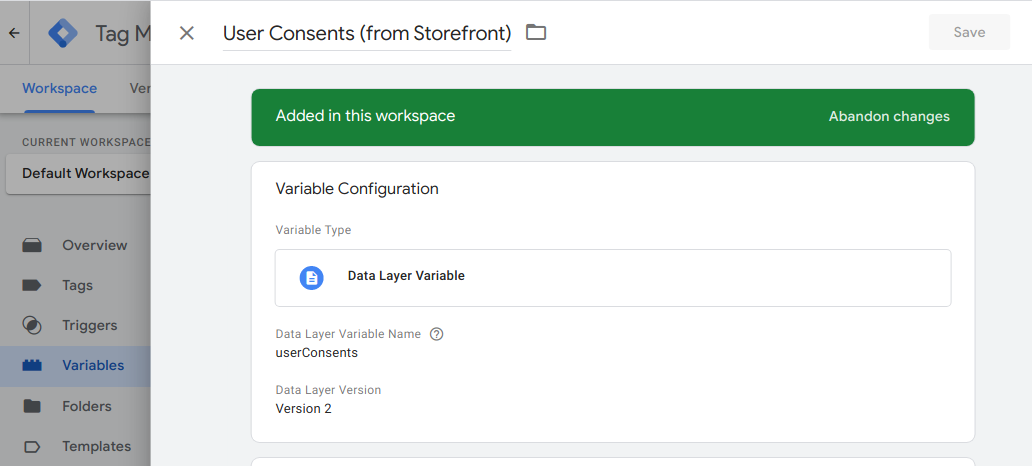
First, pushing the initConsents event will push the current customer's
authorization to your dataLayer as userConsents value. You can reference it
from a Variable in GTM. Here is an example:

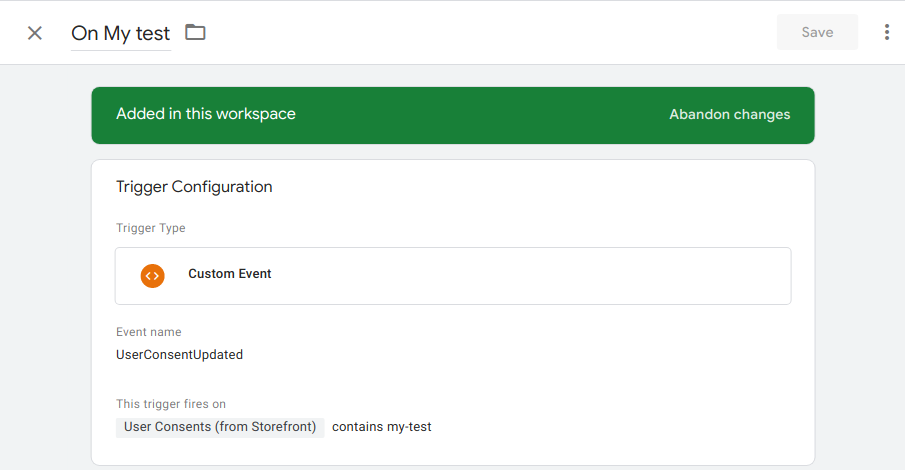
Then, you can leverage the UserConsentUpdated event tracked whenever users
update their consent preferences. You could create triggers to enable scripts to
load / remove (depending on the userConsents value). Here is an example:

Please note that to retrieve the authorized cookies services in GTM's datalayer,
services must be
declared in your analytics.js.
Meta Pixel
You can use our
example plugin
to track a pixel. This is a good starting point, the
e-commerce events
would also need to be created using the
EcommercePlugin
Matomo
To track in Matomo, you can use our example plugin as a good starting point.
Feel free to browse our examples plugins, and even contribute to them if you have any ideas! 💡
Addingwell
Prerequisites
Before configuring Addingwell in Front-Commerce, ensure that you have:
- created an AddingWell account
- setup your own server, as documented in the Addingwell Get Started official guide
With GTM
This guide will show you how to integrate Addingwell with Google Tag Manager. This way, the Analytics tag will be implemented with Google Tag Manager but the traffic will head to your custom server.
Follow the Google Tag Manager installation procedure documented above.
To use it with Addingwell you need to more steps :
- Use the GTM Web container ID instead of the Analytics container ID
- Update your CSP to add your custom domains for
scriptandconnect
module.exports = {
  //....
  contentSecurityPolicy: {
    directives: {
      scriptSrc: ["metrics.my-commerce.net"],
      //...
      connectSrc: ["metrics.my-commerce.net"],
      //...
    },
  },
  //....
};
With GA4
Follow the Google Analytics 4 installation procedure documented above.
Then you need to add additionnal configuration:
{
  name: "google-analytics",
  needConsent: true,
  settings: (authorization) => {
    return {
      customScriptSrc: "https://metrics.my-commerce.net/gtag/js?id=G-abc123",
      measurementIds: ['G-abc123'],
      gtagConfig:{
          anonymize_ip: !authorization
          transport_url: "https://metrics.my-commerce.net",
          first_party_collection: true,
      }
    };
  },
  script: () => import("@analytics/google-tag-manager"),
},