Legacy Usage (< 2.19)
The legacy version of the Analytics module will be removed in Front-Commerce version 3.0.0, please see the updated docs to learn how to upgrade your Analytics config and write new plugins as of version 2.19.
Add an integration
An integration will listen to each event and page tracking in your
application and will send it to your tracking service. To configure which
tracking service your application will use, you need to edit the
config/analytics.js file:
module.exports = {
  analytics: {
    // Make sure that your analytics is enabled
    enable: true,
    // Enables the debug mode of the `analytics.js` library
    debug: true,
    defaultSettings: {},
    // The list of integrations is defined here
    integrations: [
      {
        // The name allows to know if the user allowed to use
        // this tracking service or not
        name: "google-analytics",
        // Usually we always need to set it to true since GDPR
        needConsent: true,
        // Some integrations may have a privacy mode allowing them
        // to be enabled by default. Use this configuration to always
        // enable it. It is irrelevant if `needConsent` is `false`.
        enabledByDefault: true,

        // Settings can be an object or a function that will be called
        // with the current consent authorization from the visitor (since 2.3).
        // Since 2.6, it also receive a 2nd parameter with codes of the other consents given.
        // Using a function can allow to have different settings depending
        // on the context
        settings: (authorization, otherAuthorizations) => {
          // Settings needed by the integration
          // The fact that it the key "Google Analytics" is
          // defined by the integration itself
          // Note: otherAuthorizations = ['other-code', 'other-code-2']
          return {
            "Google Analytics": {
              trackingId: "UA-123-1",
              anonymizeIp: !authorization,
            },
          };
        },

        // integration that will add itself to the `analytics.js` lib
        script: () =>
          import("@segment/analytics.js-integration-google-analytics"),
      },
      // You can add other integrations here. They are loaded asynchronously and
      // won't impact the user's performance too much (as long as there are not
      // too many).
    ],
  },
};
Here we have used the Google Analytics integration. You can find the list of existing integrations here.
Please note that some integrations are not up to date. Even if you find one that matches your need, it might not work. However, looking into its code will let you know how to make it work, and you could eventually fork it to fix it.
GDPR consent
If your integrations need consent of the user before running, you need to setup
the config/cookiesServices.js file. This file will let you define which
cookies and trackings services are used within your application and will let the
user chose which tracking service to allow.
export default {
  default_en: [
    {
      // Category of cookies to allow the user to accept all the integrations at once in a specific category
      title: "Analytics",
      description:
        "These cookies allows us to measure the traffic on our contents and hence to improve them.",
      services: [
        {
          // The name should be the same as mentioned in the `config/analytics.js` file
          name: "google-analytics",
          title: "Google Analytics",
          // display all the cookies managed by Google Analytics
          cookies: [
            "_ga",
            "_gat",
            "_gid",
            "__utma",
            "__utmb",
            "__utmc",
            "__utmt",
            "__utmz",
          ],
          description:
            "Google Analytics cookies, from Google, are meant to gather statistics about visits.",
          link: "https://support.google.com/analytics/answer/6004245",
        },
      ],
    },
  ],
};
The consent for the cookies is stored in 2 cookies:
hasConsentcookie which stores if the user provided consent answer (authorized or denied) for all services.authorizationscookie which stores a JSON string of all consents given in the following format{ [service1_name]: true | false, ... }
These two cookies' expiration SHOULD be configured in src/config/website.js
(see
website configurations for
details on why it is important to configure this). To configure the expiration
of the consent cookies you should update src/config/website.js as follows:
module.exports = {
  default_image_url: "https://placehold.it/150x220",
  available_page_sizes: [18, 36],
  ....
  rewrittenToRoot: ["/home"],
  useUserTitles: false,
  cookieMaxAgeInMonths: 12,
};
How to create a custom integration?
You may need to integrate custom tracking scripts in your own application even
if they are not provided in
segment-integrations. The following
example explains how to create your custom integration and register it in your
src/config/analytics.js.
The example is based on pixel tracking. This is a frequently used technique in marketing & tracking tools. However, if your needs are more complex, feel free to adapt it to your needs.
Create a new integration
First, you will need to install the following library:
npm install --save @segment/analytics.js-integration
Then, you will need to create a new file where the integration will be
developed. Usually, we put them in a src/web/analytics folder in
Front-Commerce, and name the file based on the tracking we're trying to
implement. Since it's just an example, we'll call it pixel.js here.
import integration from "@segment/analytics.js-integration";

const PixelIntegration = integration("Pixel")
  // The option allows to reuse the integration with different
  // parameters. If you don't need to reuse the pixel integration
  // in different context and don't need differences between prod/staging
  // feel free to ignore it. You can add as many options you need.
  .option("trackingId", null)
  .readyOnInitialize();

// If we're trying to load the pixel every time the user opens a new page
// we should implement the PixelIntegration.prototype.page method.
// This method takes a `track` object as parameter, which will give your
// more information about the page you are on (name, URL, etc.).
// If you don't need to track a page, you can ignore the
// PixelIntegration.prototype.page method altogether.
PixelIntegration.prototype.page = function (track) {
  // Construct the url of the pixel you are trying to load in your page.
  // You can use options that were defined with the `option` method above
  const pixelUrl = `http://pixel.example.com/pixel_url?id=${this.options.trackingId}`;

  // Once we have the URL, we can add the `<img />` tag to the DOM, with
  // the correct URL. If you don't have a pixel, but a script or any kind
  // of HTML, you should use it instead of a `img` element.
  const img = document.createElement("img");
  img.setAttribute("src", pixelUrl);
  img.setAttribute("style", "position: absolute; left: -5000px; top: -4000px;");
  document.body.appendChild(img);
};

// If we're trying to load the pixel on an `event` instead, we should implement
// the PixelIntegration.prototype.event method instead. This method takes a
// `track` object as parameter, which allows to get the name of the event and
// its properties. If you are trying to track a specific event, this will be useful.
// If you don't need to track a page, you can ignore the
// PixelIntegration.prototype.page method altogether.
PixelIntegration.prototype.event = function (track) {
  const name = track.name();
  // In this example we're only tracking the event "Order Completed" which
  // is called upon an order success. If you're not sure what event you want
  // to use, enable the `debug` mode in `src/config/analytics.js` and
  // check the event's name in your browser's console.
  if (name === "Order Completed") {
    // Construct the url of the pixel you are trying to load in your page.
    // You can use options that were defined with the `option` method above
    const pixelUrl = `http://pixel.example.com/pixel_order_complete_url?id=${this.options.trackingId}`;

    // Once we have the URL, we can add the `<img />` tag to the DOM, with
    // the correct URL. If you don't have a pixel, but a script or any kind
    // of HTML, you should use it instead of a `img` element.
    const img = document.createElement("img");
    img.setAttribute("src", pixelUrl);
    img.setAttribute(
      "style",
      "position: absolute; left: -5000px; top: -4000px;"
    );
    document.body.appendChild(img);
  }
};

export default PixelIntegration;
Please keep in mind that this examples only relies on pixel images to do the
tracking. If you want to setup a more complex tracking, you can declare an
initialization step in your integration. For instance, let's say that we need to
load a script at https://tracking.example.com/tracking.js before executing our
page or event tracking. Then this means that we need to change our integration
implementation like this:
const PixelIntegration = integration("Pixel")
  // The option allows to reuse the integration with different
  // parameters. If you don't need to reuse the pixel integration
  // in different context and don't need differences between prod/staging
  // feel free to ignore it. You can add as many options you need.
  .option("trackingId", null)
-  .readyOnInitialize();
+  .tag("tagName", '<script src="https://tracking.example.com/tracking.js"></script>');

+PixelIntegration.prototype.initialize = function() {
+  this.load("tagName", this.ready)
+}
This means that we're declaring a tag with a name tagName that should be
loaded during the initialization phase. To do so, we're calling this.load with
the same tagName in PixelIntegration.prototype.initialize. And once it's
done, we're telling the integration we're done and we can start tracking by
calling this.ready. You can write an initialization phase as complex as you
want. Feel free to dig into segment-integration's repository to see more in
depth examples. For instance,
Google Tag Manager's implementation
can be a good starting point.
Register this new integration in your analytics.js
Once you are done with writing your integration, you will need to register this integration in your analytics configuration
module.exports = {
  analytics: {
    // ...
    integrations: [
      // ...
      {
        name: "pixel",
        needConsent: true,
        settings: (authorization) => {
          return {
            // The key `Pixel` here should be the same as the string
            // you've passed when you called `integration("Pixel")`
            // in `src/web/analytics/pixel.js`.
            Pixel: {
              // The keys available here are the one available through
              // the `.option([name], [defaultValue])` method in
              // `src/web/analytics/pixel.js`. You can have as many as
              // you want.
              trackingId: "123",
            },
          };
        },
        script: () =>
          // import from the file depending on where you've created it.
          import("src/web/analytics/pixel.js"),
      },
    ],
  },
};
Just like any other integrations, don't forget to setup the
cookiesServices.js file
accordingly, in order to load the newly created integration only when the user
has given their consent.
Custom integrations common pain points
In some cases, the documentation for implementing the tracking might not be
compatible with SPA's
architectures. This can be the case if they are asking you to add a script tag
in your head, or at the end of your body without any further information.
Indeed, if we're doing this, it's likely to be because the tracking service
wants to load the script tag each time the person navigates. However, if we do
this in an SPA, the script will only be loaded once. Here is the list of
solutions you can try to implement:
-
Look for additional documentation to see if they have a
scriptthat can be used as a library that gives access to some kind of global variable that can then be called by your implementation. Something that would work like the code shown below. If this is the case, it means that you can calltrackingVariable.track()in your integration instead of adding a new tag script each time.<script src="http://tracking.example.com/script.js"></script><script>trackingVariable.track();</script> -
Look inside the script itself. The script you've been given may be a shortcut and the solution might live in the script itself. If this is the case, this means that you can try to duplicate the scripts content and adapt it to your integration.
-
If none of the solutions above work, you can always try to load the script several times by adding a
?random=${new Date().getTime()}at the end of the URL. This will trick the browser into thinking they are different scripts and allow you to load it multiple times.
Implementing a great tagging plan for an e-commerce application is a tough journey. If you have any further questions about how to implement them in Front-Commerce, please contact us. We'll be happy to answer them.
Integrations
Here is a list of integrations frequently used across e-commerce shops
Google Analytics 4
Google Analytics 4 is not supported by the legacy analytics module. If you need Google Analytics 4, please use the analytics module based on analytics.
Universal Analytics (Google Analytics)
Universal Analytics will no longer process new data in standard properties starting 1 July 2023.
Install Front-Commerce's custom segment integration for Google Analytics
npm install --save https://github.com/front-commerce/analytics.js-integration-google-analytics
Configuration example in src/config/analytics.js
{
  name: "google-analytics",
  needConsent: true,
  settings: (authorization) => {
    return {
      "Universal Analytics": {
        trackingId: "UA-123-1",
        anonymizeIp: !authorization,
        // enhancedEcommerce: true, // uncomment to enable enhanced ecommerce additional trackings
      },
    };
  },
  script: () => import("@segment/analytics.js-integration-google-analytics"),
}
Update your CSP in
src/config/website.js to support the
Universal Analytics
module.exports = {
  contentSecurityPolicy: {
    directives: {
      scriptSrc: ["*.google-analytics.com"],
      frameSrc: [],
      styleSrc: [],
      imgSrc: ["www.google-analytics.com"],
      connectSrc: ["www.google-analytics.com"],
      baseUri: [],
    },
  },
};
Google Tag Manager
Install Front-Commerce's custom segment integration for Google Tag Manager
npm install --save https://github.com/front-commerce/analytics.js-integration-google-tag-manager
Configuration example in src/config/analytics.js
{
  name: "google-tag-manager",
  needConsent: true,
  settings: (authorization, otherAuthorizations) => {
    return {
      "Google Tag Manager": {
        containerId: "GW-123",
        // the userConsents option is a specific key that the integration will use and expose in the GTM dataLayer
        userConsents: otherAuthorizations
      },
    };
  },
  script: () => import("@segment/analytics.js-integration-google-tag-manager"),
}
Update your CSP in
src/config/website.js according to the tags you use (see
Google Tag Manager's documentation
for more details)
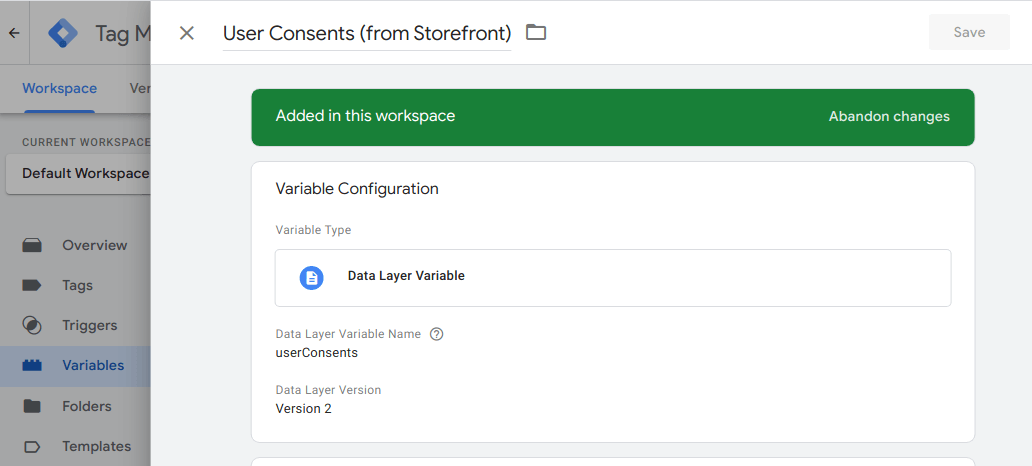
In GTM, you will then be able to leverage several specific things configured in your integrations (since Front-Commerce 2.6).
First, the userConsents configuration option will be pushed to your dataLayer
as the userConsents value. You can reference it from a Variable in GTM. Here
is an example:
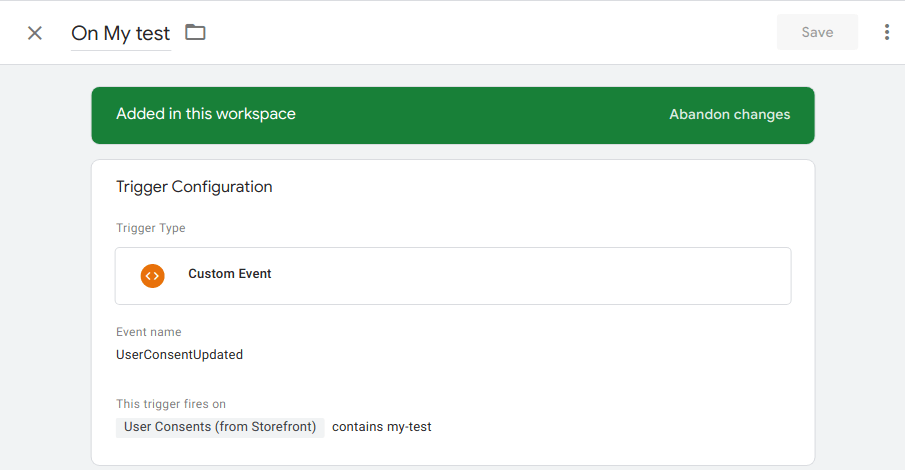
Then, you can leverage the UserConsentUpdated event tracked whenever users
update their consent preferences. You could create triggers to enable scripts to
load / remove (depending on the userConsents value). Here is an example: