Integration fields
Prismic Integration fields are custom fields for retrieving content from external systems. When using Prismic with Front-Commerce, you might want to create Integration fields for Categories, Products, or other custom entities in order to improve the Content Management experience. This guide explains how to do it.
Integration fields enable Content managers to build a landing page by selecting Products retrieved from your eCommerce backend without leaving the writing room. As a developer, you can seamlessly access the related Product data in GraphQL so that you can leverage and reuse existing GraphQL fragments and UI components.
If this is relevant for your project, follow instructions in this page to learn how you can create Integration fields that works with your existing Front-Commerce application and data.
Overview
Front-Commerce currently support Integration fields in a "Pull" mode. Here is how it works:
- Developers register Integration fields in Front-Commerce for the data to expose to Prismic (with code)
- Configure the Integration field in Prismic
- Prismic will regularly pull data from a Front-Commerce read API endpoint
- Add these fields to custom types or Slices so Content managers will see up-to-date data in the writing room and could select elements made available by Front-Commerce
- Developers implement Prismic requests that know how to transform values from an integration field into rich data from their application (with code)
- Frontend developers can build pages by requesting data from GraphQL as usual. There is no difference in data that comes from Prismic or the eCommerce platform.
This allows to design rich custom content types that will mix and match data from several datasources without introducing complexity for your frontend.
Register Integration fields in Front-Commerce
Registering a new Integration field allows to expose custom data in an API that can be used by Prismic. Front-Commerce's Prismic module provides a generic way to register Integration fields.
See the Implementations section to learn more about existing implementations.
In this example, we will use the
SitemapableIntegrationField implementation for
more concise examples. Keep in mind that any IntegrationField implementation
can be registered in a similar way.
To register a new Integration field, you must use the
loaders.Prismic.registerIntegrationField() method of the Prismic loader. You
can then provide a name that will identify it across Front-Commerce and an
implementation.
It can be done from
a GraphQL module contextEnhancer
as in the example below:
export default {
  // […]
  dependencies: [
    "Prismic/Core",
    "Magento2/Catalog/Categories",
    "Magento2/Catalog/Products",
  ],
  contextEnhancer: ({ loaders }) => {
    const { SitemapableIntegrationField } = loaders.Prismic.integrationFields;

    loaders.Prismic.registerIntegrationField(
      "Category", // <- integration field identifier
      new SitemapableIntegrationField("Category", loaders.Sitemap, ({ id }) => {
        return loaders.Category.load(id);
      })
    );
    loaders.Prismic.registerIntegrationField(
      "Product",
      new SitemapableIntegrationField("Product", loaders.Sitemap, ({ id }) => {
        // The SitemapableIntegrationField tries to guess what the id is (in this case, the SKU is used)
        return loaders.Product.load(id);
      })
    );

    return {};
  },
};
When Integration fields have been registered, Front-Commerce will expose an API
endpoint for each of them at the /prismic/integration/{name} URL. Examples:
- http://localhost:4000/prismic/integration/Category
- http://localhost:4000/prismic/integration/Product
This API is protected with a security token defined in the
FRONT_COMMERCE_PRISMIC_WEBHOOK_SECRET environment variable. To test it, you
can run the following curl commands:
curl --user 'a-secret-defined-in-webhook-configuration:' http://localhost:4000/prismic/integration/Product
curl --user 'a-secret-defined-in-webhook-configuration:' http://localhost:4000/prismic/integration/Product?page=2
You must see a paginated JSON description of your data matching
Prismic's Custom API Format.
If this is not happening, you might have an error in the registration.
Enable the DEBUG=front-commerce:prismic flag to gain a better understanding of
the error.
Configure Integration fields in Prismic
Integration fields are still a beta feature in Prismic. You must request the feature activation for your repository via the Prismic community forum or support.
You must set up Integration fields in Prismic for each Integration field registered in Front-Commerce. To do so, create a "Custom API" Integration field from the "Settings > Integration Fields" page.
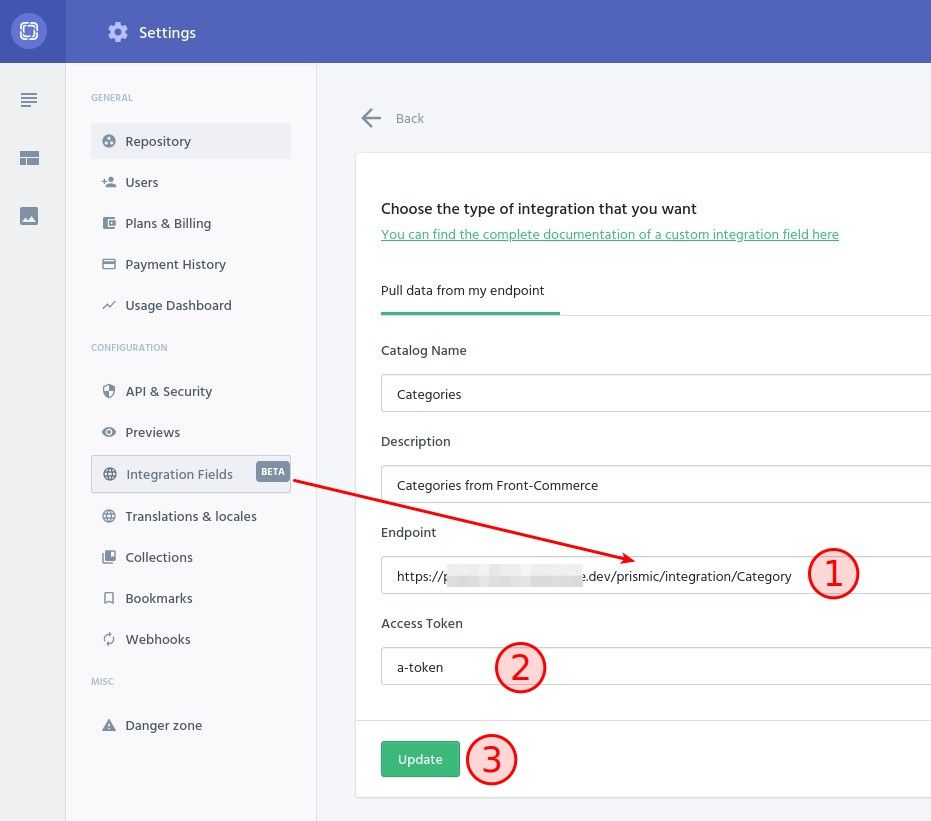
- the "Endpoint" value must be the URL of the Front-Commerce Integration
field API endpoint:
https://your-store.example.com/prismic/integration/{name} - the "Access token" value must be the value of your
FRONT_COMMERCE_PRISMIC_WEBHOOK_SECRETenvironment variable (also used for webhooks) - create the Integration field
The "Settings > Integration Fields" page will now display the Integration field data synchronization status.
Content managers can now design custom types that contain 3rd-party data from your Front-Commerce application. After the first successful synchronization, they could select values in documents without leaving the writing room.
Update your types and data in Prismic
Integration fields created in the previous section should now be available in the Custom types editor. You can drag & drop them to your content model in build mode as any other field.
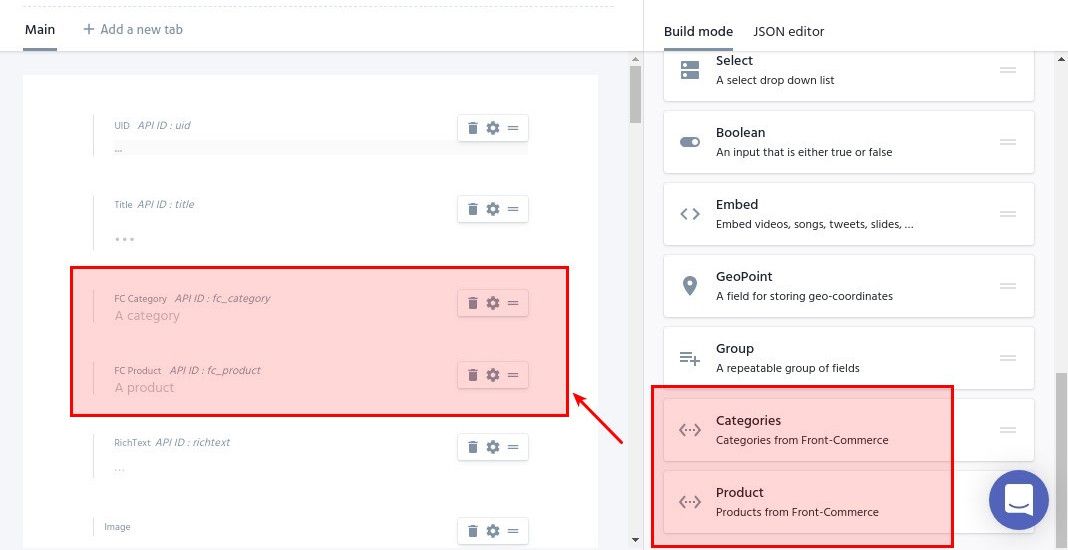
See Configure Integration Fields (Prismic documentation) for details.
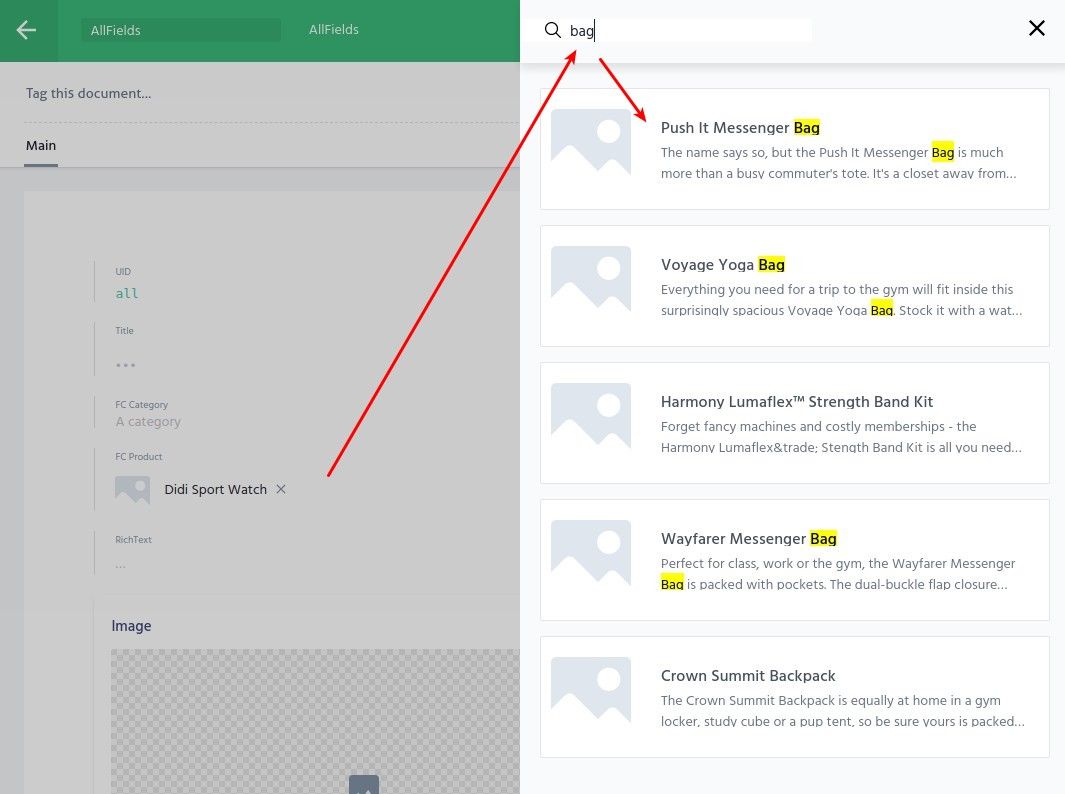
In the writing room, Content managers can now create or update documents to select values from Front-Commerce data for the configured fields:
Expose data in your GraphQL schema
This section supposes that you already have exposed content from the previously modified Prismic custom type in your GraphQL schema. It will guide you throughout the process of exposing an additional Integration field data.
We've tried to make the process as idiomatic as what you might know from implementing custom Front-Commerce features.
Add the field to your schema
First, you have to update your GraphQL schema definition with the new field to
expose. Instead of exposing an id or a SKU, we will expose an existing GraphQL
type, in this case a Product for a product field.
type MyPrismicContent {
  uid: ID
  title: String
  richtext: DefaultWysiwyg
+  product: Product
}
Update Prismic types with the IntegrationFieldTransformer
You then have to instruct Front-Commerce Prismic module to transform data from Prismic with information from a registered integration field.
The IntegrationFieldTransformer will transform data from
an Integration Field implementation. We can get the correct
Integration field instance using the name used when registering the Integration
field, using Prismic loader's getIntegrationField method.
Here is how it would look to turn a Prismic field named fc_product into a
Front-Commerce Product:
const {
  TitleTransformer,
+  IntegrationFieldTransformer,
} = loaders.Prismic.transformers;


loaders.Prismic.defineContentTransformers("allfields", {
    fieldTransformers: {
      // […]
+     fc_product: new IntegrationFieldTransformer(
+       loaders.Prismic.getIntegrationField("Product")
+     ),
  },
})


const all = await loaders.Prismic.loadSingle("allfields");
Create resolvers for these fields
as of version 0.5 of the Prismic module, resolvers must be defined as
described below. We will try in a future version of the module to make it work
out-of-the-box, without resolver changes if field names match.
To prevent fetching data systematically, fields resolve with either a null
value (empty field in Prismic) or an object with a raw value and a
loadValue() method to actually fetch the related data.
You will then have to update your resolvers to fetch integration fields real data. For the example above, here is how it would look:
export default {
  MyPrismicContent: {
    product: (content) => {
      return content.fc_product?.loadValue();
    },
  },
};
Implementations
Integration fields are implemented with extensibility in mind. The Prismic
module requires that you create an IntegrationField instance to describe an
Integration field. It will use this implementation to provide the features
documented above.
You can either:
- create a custom Integration field definition from scratch, to have full control on how data are retrieved
- use built-in Integration fields implementations to expose existing data with less code
This section lists built-in Integration fields and explains how to create a custom one.
SitemapableIntegrationField
The built-in SitemapableIntegrationField allows to expose a Sitemapable
entity as an Integration field. It reuses data fetching from the sitemap
generation process to retrieve data to expose to Prismic.
Use it to quickly expose existing content with a few lines of code.
const categoryIntegrationField = new SitemapableIntegrationField(
  "Category", // entityName
  loaders.Sitemap, // SitemapLoader
  ({ id }) => {
    // resolveEntity
    return loaders.Category.load(id);
  }
);
To create a SitemapableIntegrationField, you must provide:
entityName: the name of the Sitemapable entity used during sitemapable pages registrationSitemapLoader: a Front-Commerce Sitemap loader instance (e.g:loaders.Sitemap)resolveEntity: a Function to resolve the entity from theidvalue of the passed data
The SitemapableIntegrationField will try to automatically detect the id of
your Sitemapable entity, from either an id or a sku field. Your
resolveEntity function can leverage existing loaders to fetch data in a format
that is consistent with the rest of your application. Examples:
const resolveCategoryEntity = ({ id }) => {
  return loaders.Category.load(id)
};

const resolveProductEntity = ({ id }) => {
  // id will contain the product SKU
  return loaders.Product.load(id)
};
Custom Integration field implementation
To create new Integration fields implementations, one must implements the
IntegrationField interface.
It consists in 2 methods to:
- fetch available rows to provide data to Prismic (through the Integration field endpoint)
- resolve the real entity from the
blobdata provided to Prismic
The example below shows an implementation that exposes hardcoded data. You can use it as a starting point.
import IntegrationField, {
  PULL_PAGE_MAX_SIZE,
} from "prismic/server/domain/IntegrationField";
import IntegrationFieldResult from "prismic/server/domain/IntegrationFieldResult";

class UserIntegrationField extends IntegrationField {
  constructor() {
    super();
    this.usersDb = [
      {
        username: "john",
        firstName: "John",
        lastName: "Doe",
        avatar: "https://example.com/john.jpg",
      },
      {
        username: "jane",
        firstName: "Jane",
        lastName: "Doe",
        avatar: "https://example.com/jane.jpg",
      },
      { username: "bob", firstName: "Bob", lastName: "Dylan" },
      {
        username: "zoe",
        firstName: "Zoe",
        lastName: "Dylan",
        avatar: "https://example.com/zoe.jpg",
      },
    ];
  }

  async loadPullResults(page) {
    if (this.usersDb.length > PULL_PAGE_MAX_SIZE) {
      // TODO paginate results using the `page` parameter
    }

    return this.usersDb.map((user) => {
      // blobData value is the payload that the Integration Field will receive
      // as `resolveEntity` parameter
      const blobData = {
        userId: user.username,
      };

      return new IntegrationFieldResult(
        user.username,
        `${user.firstName} ${user.lastName.toLocaleUpperCase()}`,
        "", // a description (will use the title if empty)
        user.avatar,
        undefined, // last updated timestamp
        blobData
      );
    });
  }

  async resolveEntity(blobData) {
    return this.usersDb.find(
      (user) => user.username === blobData.userId
    );
  }
}